Since I have not made or purchased a fair light stand for my flashes, I realized that one of the reasons why I'm getting miss fires is that when a flash is leaning with the wireless receiver, the pressure, tilt or something else impacts it's connection and it looses contact . Of course, it can be solved by installing mono female connector entry into the flash, and in the trigger I installed mono male connector.
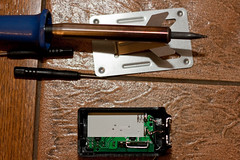 Required materials and tools for work:
- soldering iron + soldering wire
- 3.5mm mono male connector ($0,50/ pcs)
- Drill and a drill bit approximately 2.5 - 4mm
- speaker wire about 10-15cm ($0,3/ m)
- hot glue gun (not necessarily required)
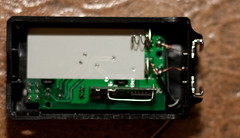
When working, you need to take care about polarity. If you're thinking about making this type of modifications, I would suggest you always keep the same way of marking wire. In my case, although I do not know is that "properly" or by profession, I have chosen an internal pin to be + and the outer one -. This means that the metal part closer to connector is "-" and the tip is "+". Accordingly, you should solder the two ends of the wire into the trigger. The wire I had, had a white line noting one line, so that one represented a "+". Although little can be seen here, after I drilled a hole and soldered ends to the trigger and the ground I made a small knot on the wire inside the body so that wire was protected against some withdrawal. If someone just pulls, there is a chance that there will be no breaking of soldering connection. When drilling make sure you do not drill through suddenly into the housing cause you might damage some of the components on the other side. Be sure to remove the batteries before you drilling or soldering.
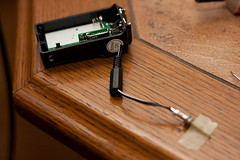
Place of wire knot within the trigger is also strengthened by hot glue, but this step is not necessarily required. When soldering mono male connector, do not forget to first put on the wire this black plastic part, then solder the connector. Given that this small connector is quite "alive", with some tape it can be attached to the table to stand still during the soldering process. If you have a professional working table with clamps, this will not be necessary.
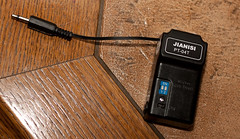
And here it is. The job is done, with all the hassle, for one hour. Only when I finish Sunpak 433AF flash modification I can tell you if this wire is long enough. Luckily, it's very easy to make changes here. Although the flash was fully dissembled, trigger has been connected and tested, and works in both ways, connected via mono connectors directly on via hot shoe. Next time we will go step by step through putting in a mono female connectors in the body of the camera flash. Although somewhat complicated, yet for only a few cents, I think that we can further improve our cheap triggers.
Note: everything that is written and performed here, was done with good intentions, and possible damage to your camera flash, or even camera body cannot be my fault cause I didn't do it to your camera/flash. ;-) Take care and be careful.
cheers
PhotoMaster
.
you are invited to follow my blog
ReplyDelete